In this post, I have shown how quickly a database backend can be built on Azure for your apps using MongoDB both on Windows and Linux. This is not a comprehensive security guide, rather creation of system user accounts which based on scenario might be the most essential security feature that’s needed for your app.
Creating a Windows/Linux VM
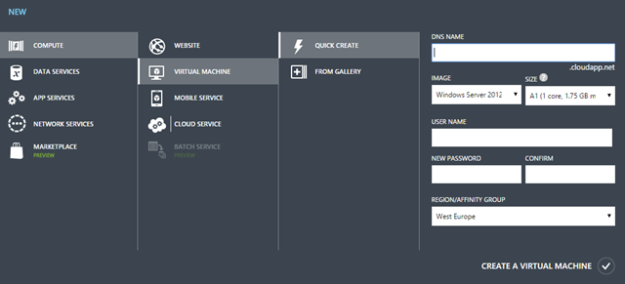
Head over to your Azure dashboard, and click New –> Compute –> Virtual Machine. Pick a subdomain for cloudapp.net (remember this, for example: yoursubdomain.cloudapp.net), an username, and password for the new VM – I have chosen a Windows Server 2012 R2 Data center edition image here – you could pick Ubuntu or other variants of Linux in the same way:
Passing-thru Firewall
Azure automatically blocks all traffic from/to the VM, so I have created an endpoint so that MongoDB can be exposed and accessed publicly:
You may need to restart the VM in order to see it reflected for the next step.
Connecting to the VM
For Windows: Click on the Connect to get a .rdp file downloaded which will help you to login to the newly created Windows environment hosted on Azure using the previously set password as above:
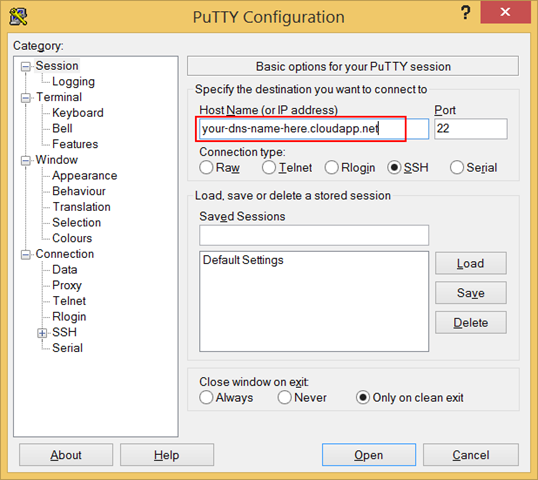
For Linux/Ubuntu: We can connect to the VM using a terminal environment and for that I use PuTTY. It’s a nice little tool and it gets the job done. Put your DNS name there and Open:
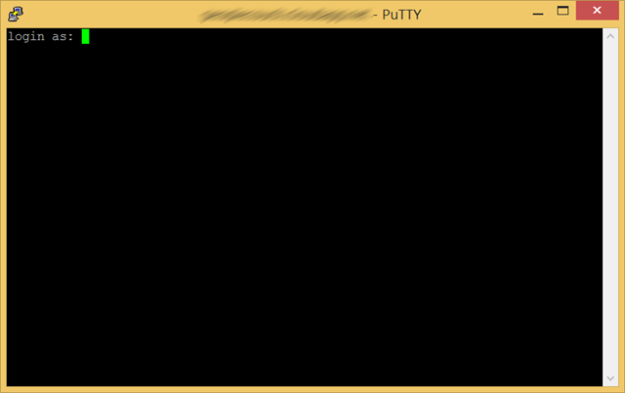
It will then launch a terminal window where you can put that user/password pair and logon to your Linux VM:
Installing and Configuring MongoDB
On Ubuntu
Once you’re connected to the VM via PuTTY, execute the following:
sudo apt-key adv --keyserver hkp://keyserver.ubuntu.com:80 --recv 7F0CEB10
echo "deb http://repo.mongodb.org/apt/ubuntu trusty/mongodb-org/3.0 multiverse" | sudo tee /etc/apt/sources.list.d/mongodb.list
sudo apt-get update
sudo apt-get install mongodb-org
Once Installed, make sure that it’s running by executing the following:
sudo service mongod start
You should expect to see the following as a result:
start: Job is already running: mongod
It’s not going to be accessible from outside world, because MongoDB’s default IP binding prevents it from getting connected beyond localhost. In order to override that, execute the following:
sudo nano /etc/mongod.conf
It will launch the Nano, a text-based text editor, which you can use to edit the mongod.conf file. From there, comment the IP binding part and uncomment the authorization required setting as below:
#bind_ip = 127.0.0.1
noauth = false
By default, MongoDB is open to localhost only, and no external connection requests are entertained. In order to change that, I have commented the bind_ip setting, however, you can always set your application server IP here, in order to allow only the app to access the database server. Now you need to restart MongoDB service:
sudo service mongod restart
You may want to disable the auth feature in future when you’d like to control more features from within your VM.
On Windows
Go ahead and download MongoDB on your server and install at any location you want, however for this post I have used the default location, for example: C:\Program Files\MongoDB 2.6 Standard\. Once you’re done, create the following directories:
- c:\data\db
- c:\data\log
Also create a file called mongo.config at c:\data with the following contents:
dbpath=C:\data\db
logpath=C:\data\log\mongo.log
noauth=false
Now run PowerShell with administrative privilege and type the following command:
cd “C:\Program Files\MongoDB 2.6 Standard\bin”
.\mongod --config c:\data\mongo.config --install
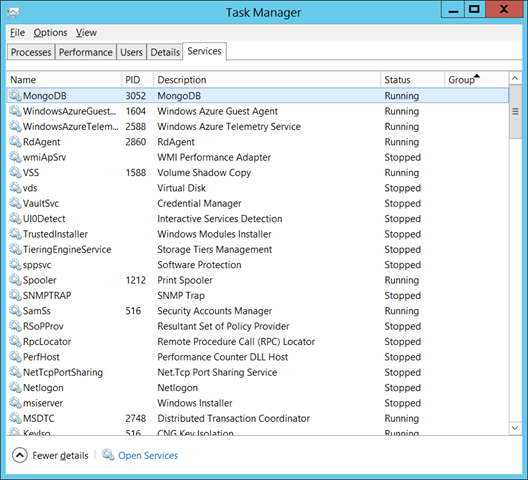
This will install Mongo DB as a service into the Windows as can be seen below:
Now go ahead and right click on the MongoDB service and click “Run.” Even if your restart your VM, this MongoDB service will startup automatically. In order to verify MongoDB service is properly running, you may want to execute the following command:
.\mongotop
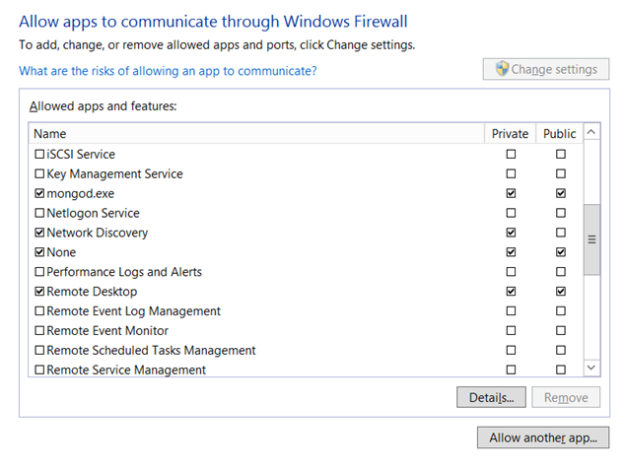
If it tells you that it has connected to 127.0.0.1, the service is running perfectly. Now that it’s running locally, we need to access it from our local machine in order to start using this backend by our apps. Lets go to the Control Panel of the VM and add an exception rule for mongod.exe as show below:
Whenever you change any MongoDB configurations, remember to restart the service from Task Manager.
Accessing from local machine
Download and install MongoDB onto the local machine. Open up a PowerShell instance with administrative privilege and execute the following command:
cd “C:\Program Files\MongoDB 2.6 Standard\bin”
.\mongo your-dsn-name-here.cloudapp.net:27017
Here are a list of sample interactions that were made from local machine to the Azure-hosted MongoDB – more on the commands, inserting/retrieving documents would be in later posts:
> db	// finding which db we are using
test
> use mydb	// explicitly mention that we want to use mydb
switched to db mydb
> c = { fruit: "coconut" }	// lets create a document
{ "fruit" : "coconut" }
> f = { name: "fox" }	// lets create another document with diff. prop.
{ "name" : "fox" }
> serial = { serial: 5 }	// lets create with int value
{ "serial" : 5 }
> db.sampleData.insert(c)	// inserting the document into a collection
WriteResult({ "nInserted" : 1 })
> db.sampleData.insert(c)	// inserting deliberately again the same doc
WriteResult({ "nInserted" : 1 })
> db.sampleData.insert(serial)
WriteResult({ "nInserted" : 1 })
> db.sampleData.insert(f)
WriteResult({ "nInserted" : 1 })
> show collections	/ show all the collections inside this db
sampleData
system.indexes
> db.sampleData.find()	// show all documents in the sampleData collection
{ "_id" : ObjectId("54be33e87ef640148c2b9014"), "fruit" : "coconut" }
{ "_id" : ObjectId("54be34127ef640148c2b9015"), "fruit" : "coconut" }	// twice
{ "_id" : ObjectId("54be34167ef640148c2b9016"), "serial" : 5 }
{ "_id" : ObjectId("54be341d7ef640148c2b9017"), "name" : "fox" }
Creating User accounts
We need to create a few users for various purposes. In order to create new users, lets go ahead change the config to noauth = true. Now execute mongo to enter the interactive mongo shell, and type the following script in order to create an user admin which you can use to administer users in the database server:
use admin
db.createUser(
  {
    user: "useradmin",
    pwd: "a-hard-password-to-remember",
    roles: [ { role: "userAdminAnyDatabase", db: "admin" } ]
  }
)
You should expect the following response:
Successfully added user: {
  "user": "useradmin",
  "roles": [
    {
      "role": "userAdminAnyDatabase",
      "db": "admin"
    }
  ]
}
Now that an user exists to manage users, lets go ahead and create a superuser which will be able to do all things:
use admin
db.createUser(
  {
    user: "superuser",
    pwd: "strong-password",
    roles: [ role: "userAdminAnyDatabase", "dbAdminAnyDatabase", "readWriteAnyDatabase" ]
  }
)
Now we need to secure MongoDB so that only authorized user can access an authorized database:
use yourdatabase
db.createUser(
  {
    user: "yourdatabaseuser",
    pwd: "password-for-user",
    roles: [ { role: "readWrite", db: "yourdatabase" } ]
  }
)
Try authenticating with the new user created:
use yourdatabase
db.auth('yourdatabaseuser', 'password-for-user')
All users are setup now – you may change the setting to noauth = false by editing the mongod.conf file:
sudo nano /etc/mongod.conf
Forget not to restart the service:
sudo service mongod restart
GUI for Managing MongoDB
There are many graphical management tools for MongoDB, which you may find here: http://mongodb-tools.com/. While connecting to MongoDB once you’ve setup an user, connection string would be something like this: yourdatabaseuser:password-for-user@your-dns-name-here.cloudapp.net:27017.


Reblogged this on Dinesh Ram Kali..
Brilliant note about bindIP… took me forever to find this out. Instead of removing bindIP you could also do
bindIP [127.0.0.1,192.168.0.55]
for providing access to specific machines. (129.168.0.55 is just a sample IP address replace with IP address of your machine you want to give access to!
Pingback: Quickbytes: How to connect to MongoDB in a VM, from OSX (bindIP) | The Lazy Blogger