In this post, I have shown how to build a platform-agnostic, continuous server-side functional test automation infrastructure that can test just about any website regardless of the server (eg. IIS/Apache) hosted, application platform (eg. ASP.NET/Java/Python/what not) and operating systems (eg. Windows/Linux) used, on & off Azure, using JavaScript which is the most open scripting language on this planet now, obviously all powered by Node.js. I hope to cover more advanced testing scenarios in future posts.
One of the most essential parts of a web application lifecycle management is test automation. You must watch out for code breaks. Especially when the app goes big and complex and when all you ever want to do is coding or focusing on solving problems, you really don’t want to test code manually. This is a waste of time and productivity. But, we are programmers and we want our test code to test our code. In this post, I have shown how you can perform server-side functional tests least but not limited to testing DOM values, etc., without launching a browser, however, though it will not be able to test client-side functionalities. I have covered a bit of Gulp, Mocha, Request, and Cheerio in order to perform functional tests on a Node.js app. It’s important to note that we’re not going to test code, rather test the functionality of our app, and at the same time, similar results if not better can be achieved by record/write & replay using Selenium as well, and there’re more eg. PhantomJs/Zombie.js, but that I might cover in future posts.
Overview of the modules
- Gulp is a build system, which will assist in running the test code as part of the build. It can watch for file changes and trigger test automatically. Popular equivalent of Gulp is is Grunt. There’re various reasons why I prefer Gulp over Grunt, which is outside the scope of this post.
- Mocha is a test framework, which gives the instruments we need to test our code. Popular alternative to Mocha is Jasmine.
- Request is one of the most popular module that can handle HTTP request/response.
- Cheerio is a cool module that can give you a DOM from HTML as string.
- Chai is a fine assert module.
Execute the following instructions to install Gulp and Mocha into the app:
npm i mocha gulp gulp-mocha gulp-util -g
npm i mocha gulp gulp-mocha gulp-util --save
The web app to test
Consider a simple Express + Node.js app that we’re putting under test, which has a few buttons and clicking on them will navigate to relevant pages. If no such page is found, a Not Found page will be displayed.
We’ll test whether the page loads properly with the expected text in the body, and clicking on Signup and Login redirect user to respective pages.
Setting up Mocha
Mocha’s expectation is that we create a ‘test’ folder and keep all the tests there. I have gone ahead and created another folder inside of ‘test’ called ‘functional.’ Now that I am going to test the home page of the app, I have also created a file called home.js where our test code related to testing the home page will reside. I have written the following code there:
process.env.NODE_ENV = 'test';

describe('Home page', function () {
    it('should load the page properly');
    it('should navigate to login');
    it('should navigate to sign up');
    it('should load analytics');
});
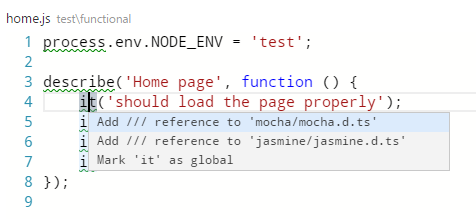
Here’s another reason why I love Visual Studio Code so much, because it allows me resolve the dependencies just like below:
I have gone ahead and chosen the first choice, which has resulted into this:
process.env.NODE_ENV = 'test';

describe('Home page', function () {
    it('should load the page properly');
    it('should navigate to login');
    it('should navigate to sign up');
    it('should load analytics');
});
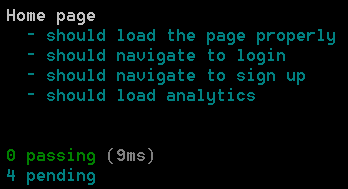
Visual Studio Code has included the type definition of the references we are using, and referred inside the .js file. I have indicated NODE_ENV an app-wide constant to inform that we’re currently in test mode, which is often useful inside the app code to determine the current running mode. More on that might be covered in future posts. Mocha facilitates us in writing specs in describe-it way. Consider these as placeholders for now, as we will look into it in a while. For now, lets say, these are our specs and we want to integrate into our build system. Now if I execute “mocha test/functional/home.js” the test will run as expected:
That’s not convenient, especially when you will have many test code and which may possibly reside inside various folder structures. In other words, we want it to run recursively. We can achieve just that, by creating a file test\mocha.opt with the following parameters as content:
--reporter spec
--recursive
Now if you execute mocha you will find the same results as previous. If you have noticed I have specified a reporter here called ‘spec’ – you can also try with nyan, progress, dot, list and what not in order to change the way Mocha reports test results. I like spec, because it gives me Behavior Driven Development (BDD) flavor.
Integrating with Gulp
Now that we have a test framework running, we’d like to include this as part of the build process, which can even report us of code breaks during development time. In order to do that lets go ahead and create a gulpfile.js at the root with the following contents:
var gulp = require('gulp');
var mocha = require('gulp-mocha');
var util = require('gulp-util');

gulp.task('test', function () {
    return gulp.src(['test/**/*.js'], { read: false })
        .pipe(mocha({ reporter: 'spec' }))
        .on('error', util.log);
});

gulp.task('watch-test, function () {
    gulp.watch(['views/**', 'public/**', 'app.js', 'framework/**', 'test/**'], ['test']);
});
Gulp is essentially a task runner. It can run defined tasks. If ‘gulp’ command is executed, it will search for ‘default’ task and execute that. Since, we didn’t declare any ‘default’ task, rather ‘test’ task, we need to specify the task name as parameter, for example, ‘gulp test’ on the command line in order to achieve the same result that we did with mocha. Second task that we have defined, with the name ‘watch-test’ watches out for the folders that I have specified here, views, public and test for file changes, if it finds any, it automatically run the ‘test’ task and report the test results. I have also included app.js which is my main Node.js file, and framework folder, where I like to put all my Node.js code. Lets go ahead execute the following:
gulp watch-test
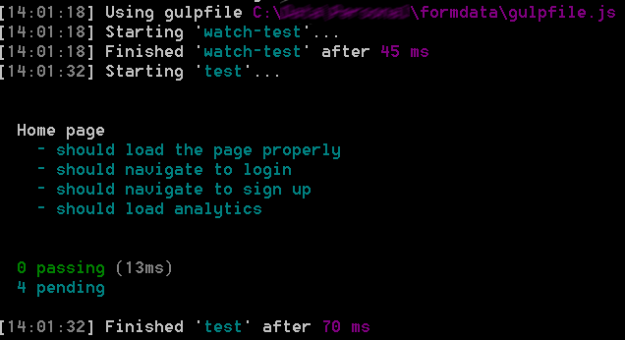
Now if you make any change to any files located in the paths above, you will see something similar to the following:
As you can see all of our tests are still pending, lets go ahead and write some tests on our setup now. We need to refer back to the test/functional/home.js file. Let us implement two simple tests, first one to succeed, and the latter to fail. I’m using Node’s assert module here to report satisfied/unsatisfied conditions.
var assert = require('assert');
process.env.NODE_ENV = 'test';

describe('Home page', function () {
	it('should load the page properly', function()
		{
			assert.ok(true);
		});

	it('should navigate to login', function()
		{
			assert.equal(2 == 4);
		});

	it('should navigate to sign up');
	it('should load analytics');
});
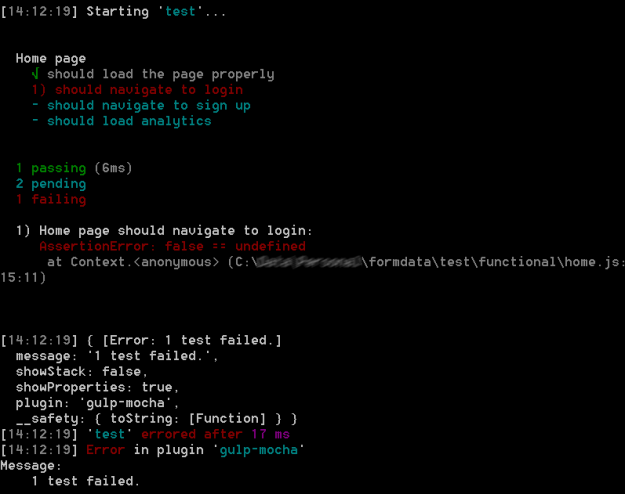
This should ideally result in the following:
Testing functionality with Request, Cheerio, Chai
Now that we’re set with the test infrastructure, let us write our specification to “actually” test the functionality. Unlike PhantomJs/Zombie.js, we are not going to change a lot of the way we have learned to write tests as of now and also it won’t require any external libraries/runtime/frameworks, eg. Python. It will also not require us to go through test framework version management nightmares. Lets go ahead and install a few more Node.js modules:
npm i request cheerio chai -g
npm i request cheerio chai --save
If you ever get to work with PhantomJs/Zombie.js/Selenium, you will see in how many places you need to change code in order to get your test code up and running. I have built this test infrastructure in order to remove all such pain and streamline the process. The only place I have to change is the test/functional/home.js file, and the rest will play along nicely.
process.env.NODE_ENV = 'test';

var request = require('request'),
	s = require('string'),
	cheerio = require('cheerio'),
	expect = require('chai').expect,
	baseUrl = 'http://localhost:3000';

describe('Home page', function () {
	it('should load properly', function (done) {
		request(baseUrl, function (error, response, body) {
			expect(error).to.be.not.ok;
			expect(response).to.be.not.a('undefined');
			expect(response.statusCode).to.be.equal(200);

			var $ = cheerio.load(body);
			var footerText = $('footer p').html();
			expect(s(footerText).contains('Tanzim') && s(footerText).contains('Saqib')).to.be.ok;
			done();
		});
	});

	it('should navigate to login', function (done) {
		request(baseUrl + '/login', function (error, response, body) {
			expect(error).to.be.not.ok;
			expect(response).to.be.not.a('undefined');
			expect(response.statusCode).to.be.equal(200);
			expect(s(body).contains('Not Found')).to.be.not.ok;
			done();
		});
	});

	it('should navigate to signup', function (done) {
		request(baseUrl + '/signup', function (error, response, body) {
			expect(error).to.be.not.ok;
			expect(response).to.be.not.a('undefined');
			expect(response.statusCode).to.be.equal(200);
			expect(s(body).contains('Not Found')).to.be.not.ok;
			done();
		});
	});
});
The code here is quite self-explanatory. I have used Request module to GET different paths of my website. I have checked for HTTP response code and if there was any error. I have used jQuery-like DOM manipulation to retrieve resulting HTML, and also used another nice module called string in order to check the string values. Cheerio was used to very conveniently load a DOM from the resulting HTML that was returned in response. And, they were all reported via chai library using “expect” flavor.
How to run it
Running it is also quite easy. Just run our application, in this case, my app is written in Node.js:
npm start
And, in another console/command prompt, run the test:
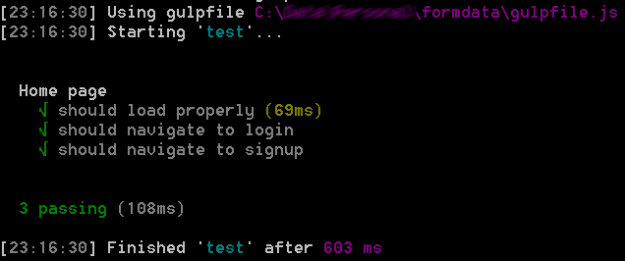
gulp test
Here’s the test results now:
Source code
I will try to continue building this project and here’s the github address: https://github.com/tsaqib/formdata and live demo is here: http://formdata.azurewebsites.net.

